



Crown Moulding: Spring Angle, Measuring and Cutting the Corners

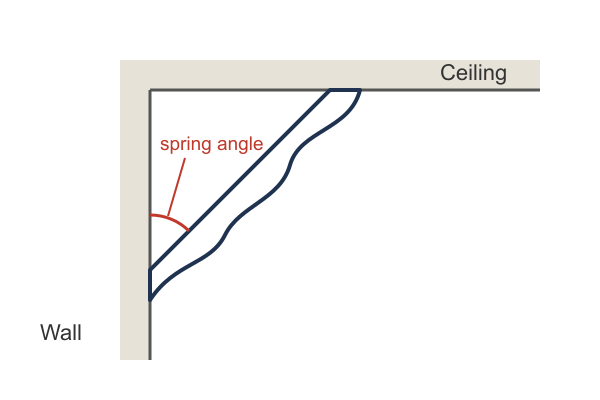
Crown moulding covers the joint where the wall meets the ceiling. Unlike baseboard or casing, it does not lie flat against one surface: it spans the corner at an angle, touching the wall at its bottom edge and the ceiling at its top edge.
That angle is what makes crown harder to cut, and it is the first thing to understand before you buy or cut a single length.
The spring angle
The spring angle is the angle between the back of the moulding and the wall. Most crown is made at one of two:
- 38 degrees, often sold as 52/38
- 45 degrees, often sold as 45/45
Check it before you cut. The back of the moulding has two narrow flats; one sits on the wall and one on the ceiling. Every piece in the room must have the same spring angle, or the corners will not meet.
Measure the room
- Measure each wall at ceiling height, not at the floor. Walls are rarely the same length top and bottom.
- Mark the studs and the ceiling joists along every wall before you start. You will need them for nailing.
- On a long wall, plan the joint where two lengths meet. A scarf joint, both ends cut at 45 degrees and overlapped, hides a gap far better than two square ends butted together. Put it over a stud.
- Buy extra for the corners. Every corner costs a few inches, and a first cut that goes wrong costs a whole piece.
Cutting the corners
There are two ways to cut crown on a mitre saw.
Nested, upside down. Stand the moulding against the fence at its spring angle, upside down: the fence plays the wall and the saw table plays the ceiling. Then a plain 45 degree mitre cuts a 90 degree corner. A stop block or a line on the table keeps every piece at the same angle.
Flat, with a compound cut. Lay the moulding flat and set both the mitre and the bevel. For a 90 degree corner:
| Crown | Mitre | Bevel |
|---|---|---|
| 52/38 | 31.6° | 33.9° |
| 45/45 | 35.3° | 30° |
These settings assume a true 90 degree corner, and few walls are one. Cut two short test pieces, hold them in the actual corner, and adjust before cutting the long lengths.
Inside corners: cope, do not mitre
- Run the first piece square into the corner, tight to the wall.
- Cut the second piece as an inside mitre, so the cut edge shows the profile.
- Cope along that edge with a coping saw, cutting away the back and following the profile line.
- Fit the coped end over the face of the first piece.
A coped joint stays closed when the wood and the house move with the seasons. A mitred inside corner tends to open.
Outside corners are mitred. Glue the mitre and pin it across the joint.
Fastening it
Nail the bottom edge into the wall studs and the top edge into the ceiling joists or the top plate. Where the joists run parallel to the wall and there is nothing to nail the top edge into, fasten a length of triangular backer block along the corner first, then nail the crown to it.
Finishing
Set the nails, fill the holes, and run a thin bead of paintable caulk along the top and bottom edges, where the moulding meets the ceiling and the wall. That line is what makes the job look finished. Use an acrylic latex caulk that can be painted, and check its paint-ready time before you paint.
What we carry for the rest of the room
We do not list crown moulding in our catalogue. For the rest of the trim, we carry primed finger-joint pine:
- Door and window casing in Colonial, Tudor, Step Bevel and more
- Baseboard, shoe base, quarter round, cove and back band
- Flat and V-groove jamb extensions
- Paintable acrylic latex caulk for the joints
Bring your sizes and the number of lengths to the counter in Concord, Barrie or Mississauga, and we will confirm the order before you travel.