



Window and Door Casing: How Much to Buy and How to Fit It

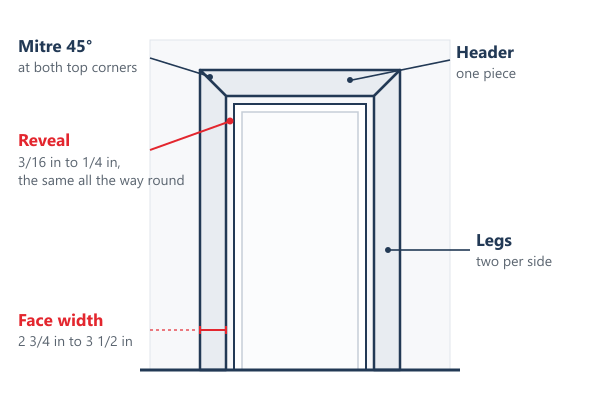
Casing is the trim that frames a door or a window. It covers the joint between the frame and the wall, and it is the part of an opening everybody looks at. Two questions come to the counter more than any others: how much do I need, and why will it not sit flat?
This page answers both. For the profiles themselves — Colonial, Tudor, Step Bevel, Back Band and the rest, with their face widths and lengths — see door and window casing profiles.
The parts of a cased opening
A door is cased with three pieces on each side: two legs and one header, mitred at 45 degrees where they meet. The picture at the top of this page names every part.
A window is usually done one of two ways. Picture framed means four pieces mitred all the way round. The other way is a stool and apron: a flat sill inside the window that the two legs sit on, with a short piece of trim beneath it.
The reveal is the narrow strip of jamb left showing beside the casing, usually 3/16 in to 1/4 in. It is there on purpose. Casing run flush to the jamb edge shows every twist in the frame; a reveal hides it.
How much to buy
Measure the opening first, then work out each piece at its long point, the longest edge of the mitre:
- A leg runs from the floor to the reveal line at the top of the opening. On a standard 80 in door in a finished jamb that is about 82 in.
- A header is the width between the two reveal lines, plus the face width of your casing twice over. On a 32 in door with 3 1/2 in casing that is about 40 in.
So one side of a standard door takes roughly 204 in of casing, near enough 17 ft. A door cased on both sides takes twice that. A 36 in by 48 in window picture framed on all four sides works out at about 200 in, which is also near enough 17 ft. Seventeen feet per opening is a fair first guess before you measure.
Our casing comes in three lengths, and what you can get out of each one is worth knowing before you order:
| Length | In feet | What one length gives |
|---|---|---|
| 90 in | 7 1/2 ft | One door leg, with a little to spare |
| 168 in | 14 ft | Two door legs, with almost nothing left. This is the length MDF casing comes in |
| 192 in | 16 ft | Two door legs, or four door headers |
Note what the table does not say: one 16 ft length will not do a whole side of a door. Two legs use 164 in of it, and the 28 in left over is short of a header. Plan the legs from one length and cut the headers from another.
Then add about 10 per cent for mitres that do not close first time, and one spare length per room. A second trip costs more than a spare stick.
Choosing the width and the material
- Match the baseboard. Casing and baseboard meet at the floor, and a wide baseboard running into a narrow casing is the first thing a finished room gets wrong. Keep one face width through a whole floor of the house.
- 2 3/4 in is the common width and 3 1/2 in reads heavier, which suits high ceilings and older houses. Both are listed in our catalogue in several profiles.
- Pine or MDF. Our pine casing is finger-joint pine, primed on all sides. We also list MDF casing, but since 1 June 2025 all MDF casing is special order, so ask about timing before you plan the job. The MDF listing does not name a moisture-resistant grade; if the trim is going somewhere damp, tell the counter where it will be installed.
See all pine casing and moulding and MDF moulding, and baseboard for the profile that has to match it.
Check the jamb before you cut
Casing has to sit on two surfaces at once: the edge of the jamb and the face of the wall. If those two are not level with each other, no amount of nailing will make the trim lie flat.
- Jamb standing proud of the wall: plane or sand the edge back until it is flush.
- Jamb stopping short of the wall: the frame needs extending before the casing goes on. See flat or V-groove jamb extensions, and the flat jamb and V-groove jamb sizes we carry.
Marking the reveal
- Set a combination square to your reveal, 3/16 in or 1/4 in, and lock it.
- Run it along the jamb with a pencil against the blade, and mark every face of the opening.
- Fit the header first, then the two legs up to it.
- Nail into the jamb along the inside edge and into the framing behind the wall along the outside edge. Casing nailed to drywall alone will move.
A reveal that wanders by an eighth of an inch is the most visible sign of a rushed job, and it costs nothing to get right except the two minutes spent marking it.
What goes wrong, and what to do
| What you see | What to do |
|---|---|
| The mitre is open at the front edge | The opening is out of square. Take a degree off the mitre on both pieces and try it on offcuts before cutting the good lengths. |
| The mitre is open at the back | Usually the wall bulging behind one piece. Back-bevel the cut slightly, or ease the drywall behind the casing. |
| The casing rocks against the wall | The jamb and the wall are not flush. Plane the jamb or add a jamb extension; do not try to nail the twist out. |
| The reveal is wider at one end | The leg was fitted to the jamb rather than to the mark. Pull it, re-mark from the header down, refit. |
| A gap between the casing and the wall | A small one is a caulk job. Anything over about 1/8 in should be scribed, or the wall eased, because caulk that thick cracks in the first heating season. |
| Nail holes show again after painting | The nails were not set deep enough. Sink them about 1/16 in below the surface, fill, sand, prime the filler, then paint. |
Finishing and keeping it
- Caulk the joint between the casing and the wall with a paintable acrylic latex caulk. Soudal Soudacryl Flex is one we list for trim and for window and door frames: it stays elastic, takes most common paints once cured, and cleans up with water.
- Prime cut ends on MDF before painting. A bare MDF end drinks paint and swells if it ever gets wet.
- Expect to re-caulk that wall joint every few years. It opens as the house moves through the seasons, and it is a ten minute job.
- Door casing wears faster than window casing, because hands and vacuum cleaners reach it. Semi-gloss stands up to washing better than flat paint.
Questions we get at the counter
Does the casing have to match on both sides of a door?
No. Each side of a door belongs to its own room, so each side can carry the trim of that room. What does have to match is the casing and the baseboard inside one room.
Can I case an opening without a mitre saw?
Yes. Square-cut trim butted into a plinth block at the floor and a corner block at the head is a traditional style, not a shortcut, and it takes every mitre out of the job. Our Back Band casing, listed at 3 3/8 in by 7/8 in, is the thickest we carry and suits that treatment.
My old trim is a profile you do not list. What now?
Bring an offcut, or a clear photograph of the cut end with a tape beside it. Face width and thickness are what matter; a close profile at the right size looks far better than an exact profile at the wrong one.
We can cut casing to your list. Bring the profile or an offcut, your sizes and the number of lengths to the counter in Concord, Barrie or Mississauga, and we will confirm the order before you travel.